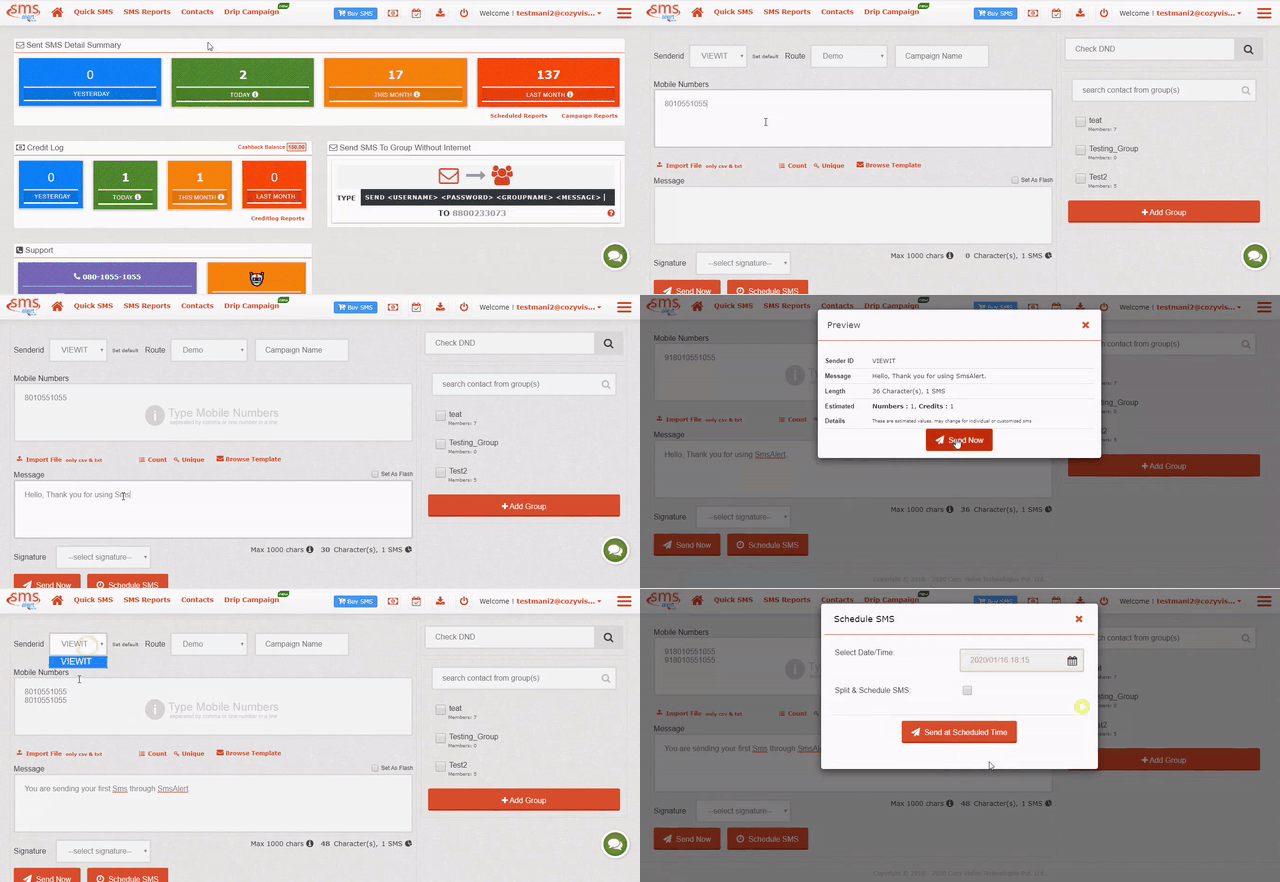
Once you have successfully created your account with SMS ALERT, you can now sent hassle-free messages to your single/multiple contacts according to your requirement.

1) Landing to the Quick SMS Page –
- Choose the option “QUICK SMS” from amongst the various options provided on the top left corner of the page.
- It will take you to the complete new page where all the details regarding the SMS is supposed to be entered correctly.
2) Selecting your Senderid –
- The first field is the “Senderid” at the top right corner,wherein the appropriate senderid is to be selected.
- Senderid is sender’s id/name, that will appear on the receiver’s side.In other words, it is the name through which you want your contacts/clients should recognize you with.
3) Naming the Campaign –
- Next comes the “Campaign Name”,which is an optional field and is not shown to end user, this is just for your reference, you can fill it so that it becomes easy for you to search this campaign in reports. Max 50 characters are allowed in this field.
4) Entering the Client’s Mobile Numbers –
Next field is for “Mobile Numbers”, where all the numbers on which the SMS is supposed to be send will come. One number per line, it has to be with country code without leading zero’s (0) or plus (+) sign. If you are having an account on SMS Alert to send SMS only to India in that case you can enter the 10 or 12 digit number, i.e. with or without country code.
- You can type the numbers manually.
- Or you can import the file of the phone numbers from your system that should be in the “txt or csv format”, through the “Import File” red highlighted option given below.
- In case you wish to check the total count of the mobile numbers, you can click the red highlighted link adjactent to the “Import File”.
5) Writing the Main Message –
- In the field “Message” given just below the “Mobile Numbers”, type the message you intent to send to your contacts. You can also select the SMS content / templates through the option given right beside the “Import File and Count”.
- Just below the message field, is the “max characters” soft quoted text written, where you can click the “italicised i” and can gather the detailed information regarding the “Message Length Summary”.
- Which contains the briefings for the “Standard GSM Characters” and the “Unicode Characters” seperately. The table will fairly give you an idea as to how much characters are to be used in single SMS. Or there are the provisions discussed if you have to increase the character’s length.
- The SMS count will be displayed below the message Box.
6) Selecting the Sender’s Signatory –
- You can optionally select the signature or the footer text that you wish to append to your message content, this could be your name, company’s name, contact details or any other vital information or disclaimer that you wish to add to the content.
7) Click on “Send Now” or “Schedule SMS” in case of special
requirement –
- By clicking on “Schedule SMS”, you will receive a pop-up, through which you can select the “Date/Time” and “Split & Schedule SMS” accordingly.
- You can choose to schedule your SMS to a reserved date and time in order to send event-specific messages to your contacts. For Example- Client’s Birthdays and Anniversaries, reminder for a certain event etc. You can also use “Split & Schedule SMS” option if you don’t want to send SMS to all of your contacts at one go and want to keep a time-lapse between certain group of contacts.
