
STEPS TO SEND THE CUSTOMIZED SMS
Through Customized SMS you can send messages to multiple recipient, it can be name, balance or any discount coupon etc.
HOW CAN I DO THAT
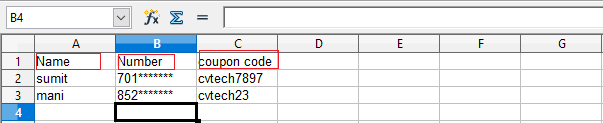
For customized SMS, first you need to make an excel file with following details, like Name, Mobile Number and other details you want to send. One important thing, every column should have a name, because when you are sending a customized message through excel file, you need to select a particular column.
Below please find the format for sending customized SMS.
Once your data is ready, log into your SMS alert panel and go to customized SMS.
After selecting the option of customize SMS a form will appear and you need to fill all the required information which are asked in the form.
First you need to upload the excel file, for that click on import button and select the file you want to upload.
Name your Campaign and select the sender id by which you want to run this campaign. If you do not know about sender id, you can check the link What is Sender ID.After selecting the sender id, select the sheet which contains all your data and then select the column which contains all the numbers. For example, i have a column with column name “Number”, select that column. The format is shown below:
Now select the template, if you have an approved one. There will be two text box, one in which you will write your sms content, the other one with name, number and other details like coupon code or balance etc.
You can select them and can use them as variable to change the data dynamically for different numbers.
After completing the form, click on the send button or you can set a time for the campaign.
STEPS TO SEND THE CUSTOMIZED MESSAGES-
1) Selecting Mobile Numbers/Selecting sheet of Mobile Numbers-
- Click the “Import File” red Highlighted upload option given at the top of the page,to select the file containing Mobile Numbers on which you have to send the Customize Messages.
- The file form of “.xls” and “.xlsx” are supported with upto 50,000 contacts in one batch at a time. Make sure the Excel File contains Defined Column names for each Column to avoid any confusion.
2)Framing the appropriate Campaign Name-
- The field “Campaign Name” will automatically take the name of the file you have imported for the contacts,nonetheless you can change the name if you choose to pick up name other than the imported file name.
3)Select appropriate sender id,from which you wish to send the SMS to your contacts-
- Senderid is sender’s id/name, that will appear on the receiver’s side.In other words,it is the name through which you want your contacts/clients should recognize you with.
4)Select the column containing the mobile Number-
- In this field,through the drop-down,you have to select the “name of the column” in which the mobile numbers of your clients/customers are stored. Any which way,once you import the contact’s file,this feild will going to take up the values by default.
5)Select the Pre-Saved Templates or Write them manually-
- In case you want to send some Information that you have marked as “Repeatedly Used Messages” in the form of Templates,you can select them through the drop-down menu to decrease your effort of writing that same message again.
6)SMS Content-
- Below the Template Field, there is a rectangular box that by default takes up all the column names present in your File the moment you import it.The Box content will help you in framing the message.You can Select the Variable Name from this rectangular-box at any required point while framing your message.And the variables in the SMS Content will get converted into the specific customer oriented information when send to customer/clients.
7)Understanding the Message Length Summary-
- You can click onto the “italicised i” to take the information regarding the Message Length Summary.It will give you information regarding the number of characters that are allowed in 1 SMS. Know that,160 characters are allowed in 1SMS-Out of these 160 characters,7 characters are set aside for User Data Header.
User Data Header (UDH) is a binary structure which may be present at the start of a short message in an SMS. It does not contain any text, but rather specifies how the message should be processed. UDH basically helps frame/concatenate the message on handset. So UDH basically contains total number of message parts and sequence number of the SMS part.
So,we keep aside 7 characters for UDH,and calculate the successive number of messages in the multiples of 153[160(total)-7(UDH)] till 1000 maximum characters.
You can keep track of the number of messages through the message count at the bottom right corner under the Content Box.
8)Click on “Send Now” –
- Once you are sure of the content of the message and the names of the customers/clients, you can click send now option-clicking it will fetch you a Preview Window displaying the “Entire Message” framed properly,hence if you are satisfied with the message Build-up, click on Send, and if not,you can choose to make desired changes.
9)Click on schedule Message in case of Special Requirement-
- By clicking on “Schedule SMS”, you will receive a pop-up,through which you can select the “Date/Time” and “Split & Schedule SMS” accordingly.You can choose to schedule your SMS to a reserve date and time in order to send event-specific messages to your contacts
USED CASES
We can have a keen look at the scenarios where you can utilize this option-
- If School Management wants to sent the intimation of Fees to be paid for the particular month to the wards of the Students.
- If Certain Online Shopping Websites wants to send customized offers to the customers based on their Wallet Balance.
- If Government/Private Authorities wants to sent the intimation of the Bill Payments to their Customers.
- If Financial/Non Financial Institutional Bodies wants to send Reminders of the Expiration/Renewal of Policies and Products Purchased by their Users. And so on !!